Wednesday 1 March 2023

Reset root password on Ubuntu box

 Resetting root pwd: 

1.       At the Grub boot menu press 'e' before the system boots 


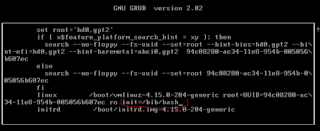
2.       In the GRUB boot options, scroll down and locate the line that begins with ‘linux’. In this line move the cursor to the end of this line, after ‘ro quiet’ or 'ro' and  append the parameter init=/bin/bash 


3.       Press Ctrl+X 

4.       You will see a root prompt. 

·         :/#  

·         Type "mount -n -o remount,rw /": 

·         :/# mount -n -o remount,rw /  

·         This will mount the system as read and write (instead of the read-only, which is the default.) 

·         Set the password of any user(s) whom it is forgotten for. 

·         To see the list of users enter :/#cat /etc/passwd 

·         :/# passwd administrator 

·         Press Ctrl+D or Ctrl+Alt+Del to exit. 

·         Reboot 


Wednesday 7 December 2022

Cosole connection to Aruba IAP 205H

Aruba IAP 205H

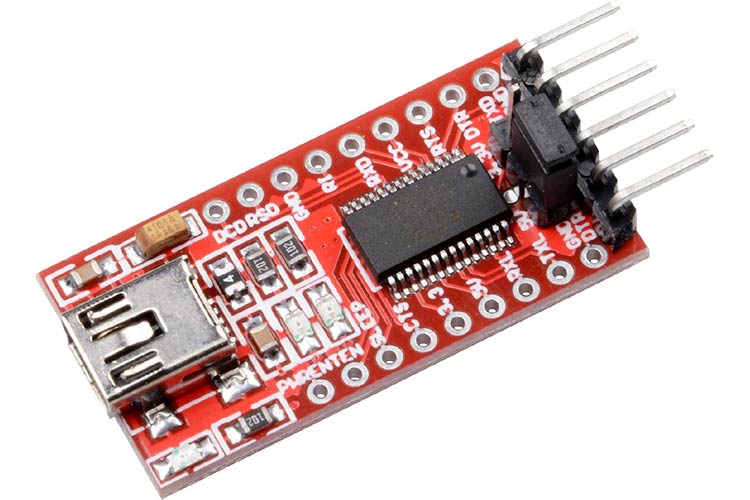
Some Aruaba AP's such as IAP209H don't have the usual RJ45 console ports. Instead the official guide from Aruba is to purchase a serial cable AP-CBL-SER in order to interface with the 4pin header on the back of the AP. If you don't want to spend on additionl cables you could use a TTL adapter and a few dupoint cables/jumper wires to connect to the console port.

To connect you would need the following components

1x FT232RL USB to TTL 3.3/5v FTDI Serial adapter


3x Dupont cables


Connect to the 4 pin header as the diagram below. Make sure that the TTL adapter is set to use 3.3V not 5V.


Next make sure that the AP is powered with an adapter or best PoE to your router.

If you launch terminal you should be able to see the AP booting.

Further instructions of how to install your IAP can be found here: Aruba IAP-205H Access Point Installation Guide (hpe.com)


Thanks


Friday 19 August 2022

Fortigate HA Troubleshooting


#get system status

on both devices

#execute ha manage 1 username

#diag sys ha checksum cluster

all cluster members should have the same checksum


Tuesday 14 September 2021

Cisco Unity Connection Logs Collection CLI

I had a weird DTMF issue once and Cisco TAC wanted some logs collected from CUC but for some reason RTMT was showing blank records no matter of the selection. 

So in order to collect the logs aftrer the test calls have been placed I used the folowing command to get the logs.

 admin:file get activelog cuc/diag_CuCsMgr*

 Make sure that you have a SFTP server running as you will be prompted the following after you run the command above:

Would you like to proceed [y/n]? y
SFTP server IP: X.X.X.X
SFTP server port [22]: 22
User ID: cisco
Password: *****
Download directory: /

Once done check your SFTP folder you should have all CUC logs there.

Continued 14/09/2022 ....

Another log collection and packet capture  for issues with licencing

utils network capture eth0 file capture1 count 1000000 size ALL


then to get the logs with sftp as above:

file get activelog cuc/diag_CuSlmSvr*

and 

file get activelog platform/cli/*


Friday 18 June 2021

Cisco IOS Upgrade

 Step 1

- Start your choosen ftp/scp server


Step 2

- List existing files and  make sure that you have suficient space on the Cisco router

VG#dir                                                                   
Directory of flash0:/

    1  -rw-          35  May 22 2017 22:18:02 +01:00  pnp-tech-time
    2  -rw-        3066  Feb 16 2017 06:18:00 +00:00  cpconfig-29xx.cfg
    3  -rw-       17595  May 22 2017 22:18:10 +01:00  pnp-tech-discovery-summary
    4  drw-           0  Feb 16 2017 06:18:20 +00:00  ccpexp
  374  -rw-       22737  Feb 16 2017 06:21:12 +00:00  home.html
  375  -rw-   110621884  May 22 2017 22:13:24 +01:00  c2900-universalk9-mz.SPA.156-3.M2.bin
 
250908672 bytes total (17870848 bytes free)


 Step2

- Make a backup of existing upgrade files and running config

 VG#copy flash:c2900-universalk9-mz.SPA.156-3.M2.bin scp://172.X.X.X/c2900-universalk9-   mz.SPA.156-3.M2.bin

VG#copy running-config scp://172.X.X.X/VGrunningconfig.txt

Step 3

- Download the image from Cisco.com and save your new IOS file in the root of your ftp server 

C:\SFTP_Root

Step 4

 - Copy the file to your Cisco device

VG#copy scp://172.X.X.X/c2900-universalk9-mz.SPA.156-3.M9.bin flash:

At this point you may want to verify the integrety of the file so you can run the following command

VG#verify /md5 flash:c2900-universalk9-mz.SPA.156-3.M9.bin

The output will give you the checksum like this:

(flash0:c2900-universalk9-mz.SPA.156-3.M9.bin) = bc6b0373fd88ee1794bf23a89e62c6ac 

I have HashCheck extension tool installed on my Windows 10 so I can right click on the image file and in the Checksums tab paste the output from your router and you should get a match.


Step 5

- Before you apply the new image you can check the currently used image with show version command

VG#show ver

VG uptime is 4 years, 3 weeks, 6 days, 14 hours, 45 minutes
System returned to ROM by power-on
System restarted at 19:16:25 BST Mon May 22 2017
System image file is "flash0:c2900-universalk9-mz.SPA.156-3.M2.bin"
Last reload type: Normal Reload
Last reload reason: power-on

Step 6 

- Apply the new image from global config mode. As noted by Vlad my UC support engineer it's always good idea to add the original image as a secondary option so should the image in line 1 fails the router can always boot into the original image by using the second line. Obviously do the reload out of hours.

thanks Vlad

VG(config)#boot system flash:c2900-universalk9-mz.SPA.156-3.M9.bin

VG(config)#boot system flash:c2900-universalk9-mz.SPA.156-3.M2.bin

VG#wr mem

VG#reload

 Job done!!