Tuesday, 24 December 2019

Cisco ASA debug
Some usefull debug commands for ASA:
packet-tracer input Internet tcp X.X.X.X http X.X.X.X 6 http
packet-tracer input Internet icmp X.X.X.X 8 0 X.X.X.X detailed
To do a capture:
access-list capin permit ip host 10.10.10.x host 10.10.20.x
access-list capin permit ip host 10.10.20.x host 10.10.10.x
capture in access-list capin interface inside
then initiate the traffic from client to server, and use "show capture capin" to see if you can see the traffic in both directions.
Check IP Route:
show route
show asp table routing
packet-tracer input Internet tcp X.X.X.X http X.X.X.X 6 http
packet-tracer input Internet icmp X.X.X.X 8 0 X.X.X.X detailed
To do a capture:
access-list capin permit ip host 10.10.10.x host 10.10.20.x
access-list capin permit ip host 10.10.20.x host 10.10.10.x
capture in access-list capin interface inside
then initiate the traffic from client to server, and use "show capture capin" to see if you can see the traffic in both directions.
Check IP Route:
show route
show asp table routing
Cisco IP phone remote login to extension mobility via web url
- You created new user device profile
- You know the MAC address of the phone the user will be login on
- How can you log them in without the end user input
Easy just browse to the url below and replace the MAC and the username with the appropriate user ID that has been assigned the UDP.
http://CUCM IP/emapp/EMAppServlet?device=SEPXXXXXXXX&&userid=username&seq=12345
Hope this helps
Wednesday, 29 August 2018
Tuesday, 28 August 2018
How to use BAT to add user devidce profile (UDP) on CUMC v11.5
- Download bat_xxxxxx.xlt from CUCM
- Select the User Device Profiles tab
- Click on Create File Format and confirm that you wish to overwrite the existing CSV format after selecting the required fields for UDP profile - this will re-create the file with all selected fields see the fields I have used.

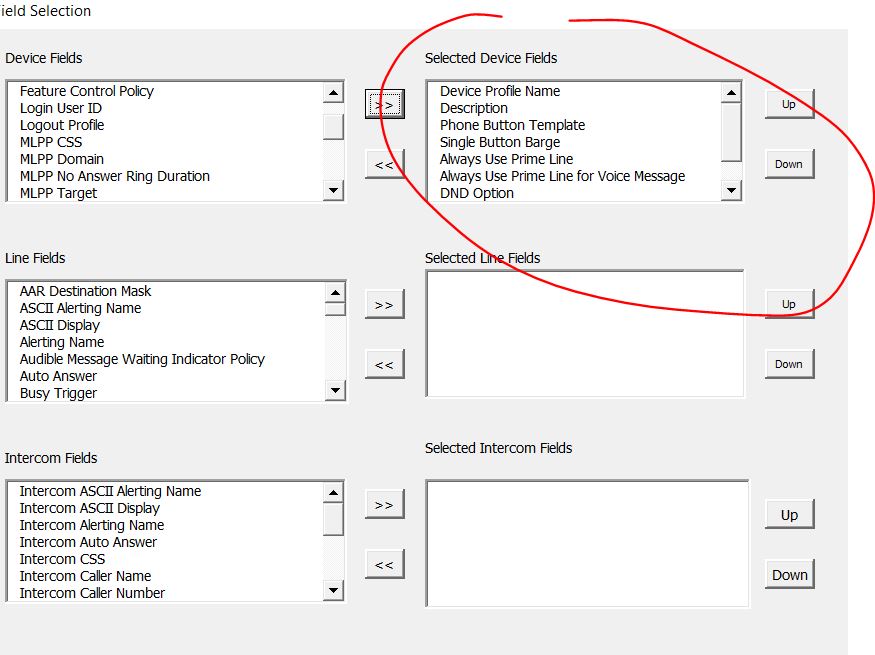


- Next populate the form and click on export to BAT Format - this will generate the file we need to import the UDP profiles, it will look something like that:
DEVICE PROFILE NAME,DESCRIPTION,PHONE BUTTON TEMPLATE,SOFTKEY TEMPLATE,PRIVACY,SINGLE BUTTON BARGE,ALWAYS USE PRIME LINE,ALWAYS USE PRIME LINE FOR VOICE MESSAGE,DND OPTION,MLPP INDICATION,MLPP PREEMPTION
UDP_Test_User_1,UDP_Test_User_1,Standard 7911,Standard Comp 7911 User,Default,Off,Default,Default,Use Common Phone Profile Setting,Default,Default
UDP_Test_User_1,UDP_Test_User_1,Standard 7911,Standard Comp 7911 User,Default,Off,Default,Default,Use Common Phone Profile Setting,Default,Default
- Now upload the file to CUCM>Bulk Admin>Upload files as Insert UDP - Specific Details

- Next Select Bulk Admin>User Device Profiles> Insert UDP, select Insert Specific details and select the file that you just uploaded and use the appropriate template for your phone. My template looks as below. Once you run this job you should have a list of users dev profiles as in the file.


Wednesday, 24 January 2018
How to remove ospf route from HP switch
HP 2950's
Let's say you enter a wrong ip route on a switch and you want to remove it.
Of course first thing you would try will be the no ip route command and job done,but what if it doesn't work. Well it took me a while to click that it doesn't because I'm trying to do it on the wrong switch.
Let's say you enter a wrong ip route on a switch and you want to remove it.
Of course first thing you would try will be the no ip route command and job done,but what if it doesn't work. Well it took me a while to click that it doesn't because I'm trying to do it on the wrong switch.
Destination Gateway VLAN Type Sub-Type Metric Dist
XXX.27.0.161/32 XXX.28.248.38 100 ospf External2 10 110
The sub-type of the route is showing as External2 so based on that work out from which switch is the route coming from.
#show ip ospf external-link-state
This command will give you the router id IP
#show ip ospf link-state router-id ip addr
This will show you all the associated networks with that particular router-id
You can then login to all the switches on the list and check which one has the static route you trying to remove . Once you got the route just use the standard command
#no ip route ..... and the rest
Now it works
Now it works
Thursday, 5 October 2017
Fortigate Policy based IPSEC
How to NAT traffic over policy based IPSEC VPN
http://kb.fortinet.com/kb/viewContent.do?externalId=FD33638
Env:PC>>HQ Fortigate 1000C>>IPSEC VPN>>Site 1Fortigate300C>>Some service
It has been one of those weeks where I've been scratching my head for a week to set some new service on the corporate firewall.
On first glance it looks straight forward but the traffic is supposed to exit on different to the default Internet traffic interface.
Step1
- Set up the VPN between the HQ and Site 1 and add P2 ranges
- Ensure that Policy has : #set inbound en | #set outbound en
Result: I could see the traffic from Site1 fortigate entering the IPSEC VPN to HQ FG
diagnose debug disable
diagnose debug reset
diagnose debug flow show console enable
diagnose debug flow filter addr 10.10.10.10
diagnose debug flow trace start 100
diagnose debug console timestamp enable
diagnose debug enable
Step 2
- now the issue here was the interesting traffic from the vpn was being drop by policy 0( no match)
To get around this I created new policy for all traffic that is coming from the remote destination to the Site1 remote network and set it to use the IPSEC tunnel to the remote site I set up earlier.
Traffic is allowed to be initiated from the remote end on the tunnel.
Now the crucial part here was to make sure that NAT is enabled for that particular policy:
#conf fir pol
#edit 1234
#set natinbound en
#set outbound dis
#set natip 90.90.90.90 255.255.55.255 (IP of the gw the traffic will be coming from the remote party)
.. and that did the trick
Subscribe to:
Posts (Atom)